
The only way to integrate Kubernetes with AWS

Introduction
Securing access to Cloud services and infrastructure is difficult. Between the hundreds of services provided by AWS and their respective APIs that they expose, achieving granular and controlled access to all these services is not an easy task. One service's API can easily exceed 50 actions. You can do the math.
AWS provides a way to manage access to their services. Through AWS IAM Policies, we can provide very restrictive and role-based access to any service on AWS. This is also true to managing access between services. AWS also provides a way to leverage its AWS IAM access control through federative access, more specifically through OpenID Connect.
Before diving into the solution, I would like to explain some concepts to people who are not familiar with AWS IAM and OpenID Connect.
AWS IAM
AWS IAM, or AWS Identity and Access Management, is a solution for identifying and managing access to AWS services. It provides three identities (per AWS docs):
- User: An identity that represents and identifies one single person or application. A user has a set of permissions for what they can and can't do. For example, a developer can access an S3 bucket but can't delete data on it. To access the AWS API through the AWS CLI or AWS SDK, a user uses an ACCESS KEY and a SECRET KEY.
- User group: An identity that clusters a specific set of users and grants or denies them permissions over AWS services. For example, an administrator User Group that can manage, virtually without restrictions, AWS Services.
- Role: An identity that provides specific permissions. It is not a user. An AWS IAM Role is like a hat or a uniform that an entity wears temporarily and not exclusively, meaning another entity could come and take the same role simultaneously. We talk about the Assume action. I used the term entity because assuming a role is not exclusive to IAM Users. It can be used in multiple use cases.
OpenID Connect (OIDC)
OIDC is an authentication protocol based on OAuth2.0 (a layer on top of it, if you will). The OAuth2.0 protocol has been designed to ease integration between applications or services. Let's take an application that helps you understand and create fancy charts for your monthly spending based on your bank account transactions. Before OAuth, the user would have to give his bank credentials to this application, which is not ideal, to say the least (shady, very shady). OAuth solved this issue.
Since OAuth, a user can grant specific permissions to an application to access certain data about his bank account and transactions. The workflow, as described by RFC6749 is:
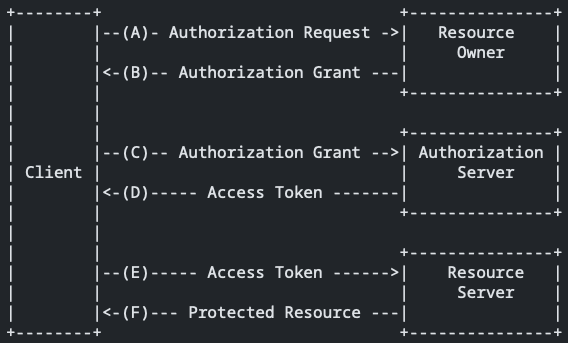
- Resource Owner: The user.
- Client: The application the user is using.
- Authorization Server: The server that authenticates the user to access his bank account.
- Resource Server: The server that holds or presents data to the user.
A more detailed workflow can be detailed in this diagram:
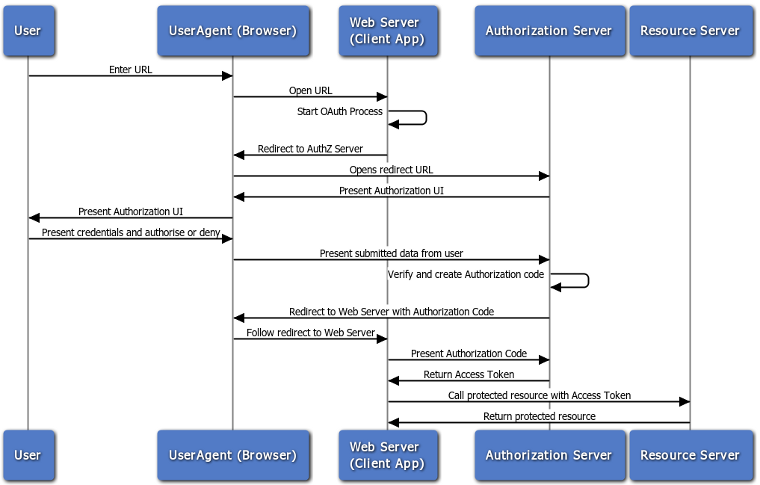
The Client App and the Authorization server should know each other before this transaction could succeed. In fact, the Authorization Server has already provided the Client App with a client-id and a client-secret. When the Client App presents the authorization code, it provides with it the client-id and the client-secret for example; otherwise the Authorization Server will reject the call.
In OAuth2.0 the Client App doesn't care about what the Access Token is. As far as it is concerned, it is some gibberish that, when presented to the Resource Server, it is happy to provide the Client App with the requested resources.
OIDC adds a layer on top of this workflow. In this case, the Client App doesn't even need to have users of its own. It can trust the Authorization Server to identify users. And so, the Client App instead of getting back an Access Token, it gets an Id Token. This token provides the Client App with information about the user. Of course, the Client App and the Authorization Server agree on a set of key/value to exchange.
Goals & Objectives:
At the end of this blog, you will have everything you need to understand and implement a seamless integration between Kubernetes Service Accounts and AWS IAM Roles.
The problem
Let's suppose we have a Kubernetes cluster where Pods interact regularly with AWS services. For the sake of this blog, we will take the example of a Pod that writes and reads from an S3 bucket and a Pod that only reads from the same S3 bucket.
A solution would be to provide these Pods each with an Access Key and a Secret Key linked to an IAM User that has the adequate permissions to achieve the desired functionalities. But what if these keys got leaked? How would we know that they got leaked? Another solution is to use the Assume Role action on an IAM Role to get temporary credentials. But how can this be achieved?
Prior to late 2019, multiple open source solutions tried to leverage the Security Token Service (sts) Assume Role action to give permissions to a Pod. Kube2iam is one of them. It works as a proxy or an interceptor; it assumes the role on behalf of the Pod and provides it with temporary credentials as if the Pod itself were the one who assumed the IAM Role. Kube2iam uses EC2 instance profiles behind the scenes. What if I have my Kubernetes cluster outside of AWS? And what if I want to cut out the middleman?
The solution
Remember OIDC? Buckle up!
AWS IAM has a functionality called Identity Providers. This functionality gives us the option of telling AWS IAM to trust identities coming from other sources. AWS IAM Identity Providers can be either SAML or OIDC-based. Which means if we can deploy an OIDC provider for Kubernetes Service Accounts, we can leverage Kubernetes Service Accounts on AWS IAM using AWS STS and OIDC federation access. But first, let's understand how authentication works on Kubernetes.
Kubernetes authentication
Kubernetes Control plane adds automatically (if not instructed otherwise) a token to Pods. This token authenticates a Service Account on the Kubernetes API Server. When a Pod creation request is sent to the API Server and the Pod specifies the .spec.serviceAccountName (defaults to "default"), it goes through multiple stages before deploying, especially through the Admission Controller which mutates the Pod by mounting a Projected Volume to the said Pod. The volume contains the token. Every API call to the Kubernetes API Server by the pod can be identified through this token. What if we could do the same to access the AWS API?
IAM Roles for Service Accounts (IRSA)
While there is the authentication of Service Account is by default available on Kubernetes, using Kubernetes Service Accounts seamlessly with AWS IAM requires a bit of configuration. This is where the Amazon EKS Pod Identity Webhook comes into play. Using the same concept, we are going to create and sign JWT Tokens for AWS API access.
Amazon EKS Pod Identity Webhook also listens to Pod creation actions and adds a token through a Projected Volume if the Service Account bound to the Pod has a specific set of Annotations (prefixed to eks.amazonaws.com by default). For example, if we want to assume a role named s3-access, we would want our Service Account to have an Annotation similar to:
apiVersion: v1
kind: ServiceAccount
metadata:
  name: my-serviceaccount
  namespace: default
  annotations:
    eks.amazonaws.com/role-arn: "arn:aws:iam::111122223333:role/s3-access"
    # optional: Defaults to "sts.amazonaws.com" if not set
    eks.amazonaws.com/audience: "sts.amazonaws.com"
    # optional: When set to "true", adds AWS_STS_REGIONAL_ENDPOINTS env var
    #   to containers
    eks.amazonaws.com/sts-regional-endpoints: "true"
    # optional: Defaults to 86400 for expirationSeconds if not set
    #   Note: This value can be overwritten if specified in the pod
    #         annotation as shown in the next step.
    eks.amazonaws.com/token-expiration: "86400"
The mutating webhook also adds at least two environment variables: AWS_ROLE_ARN and AWS_WEB_IDENTITY_TOKEN_FILE.
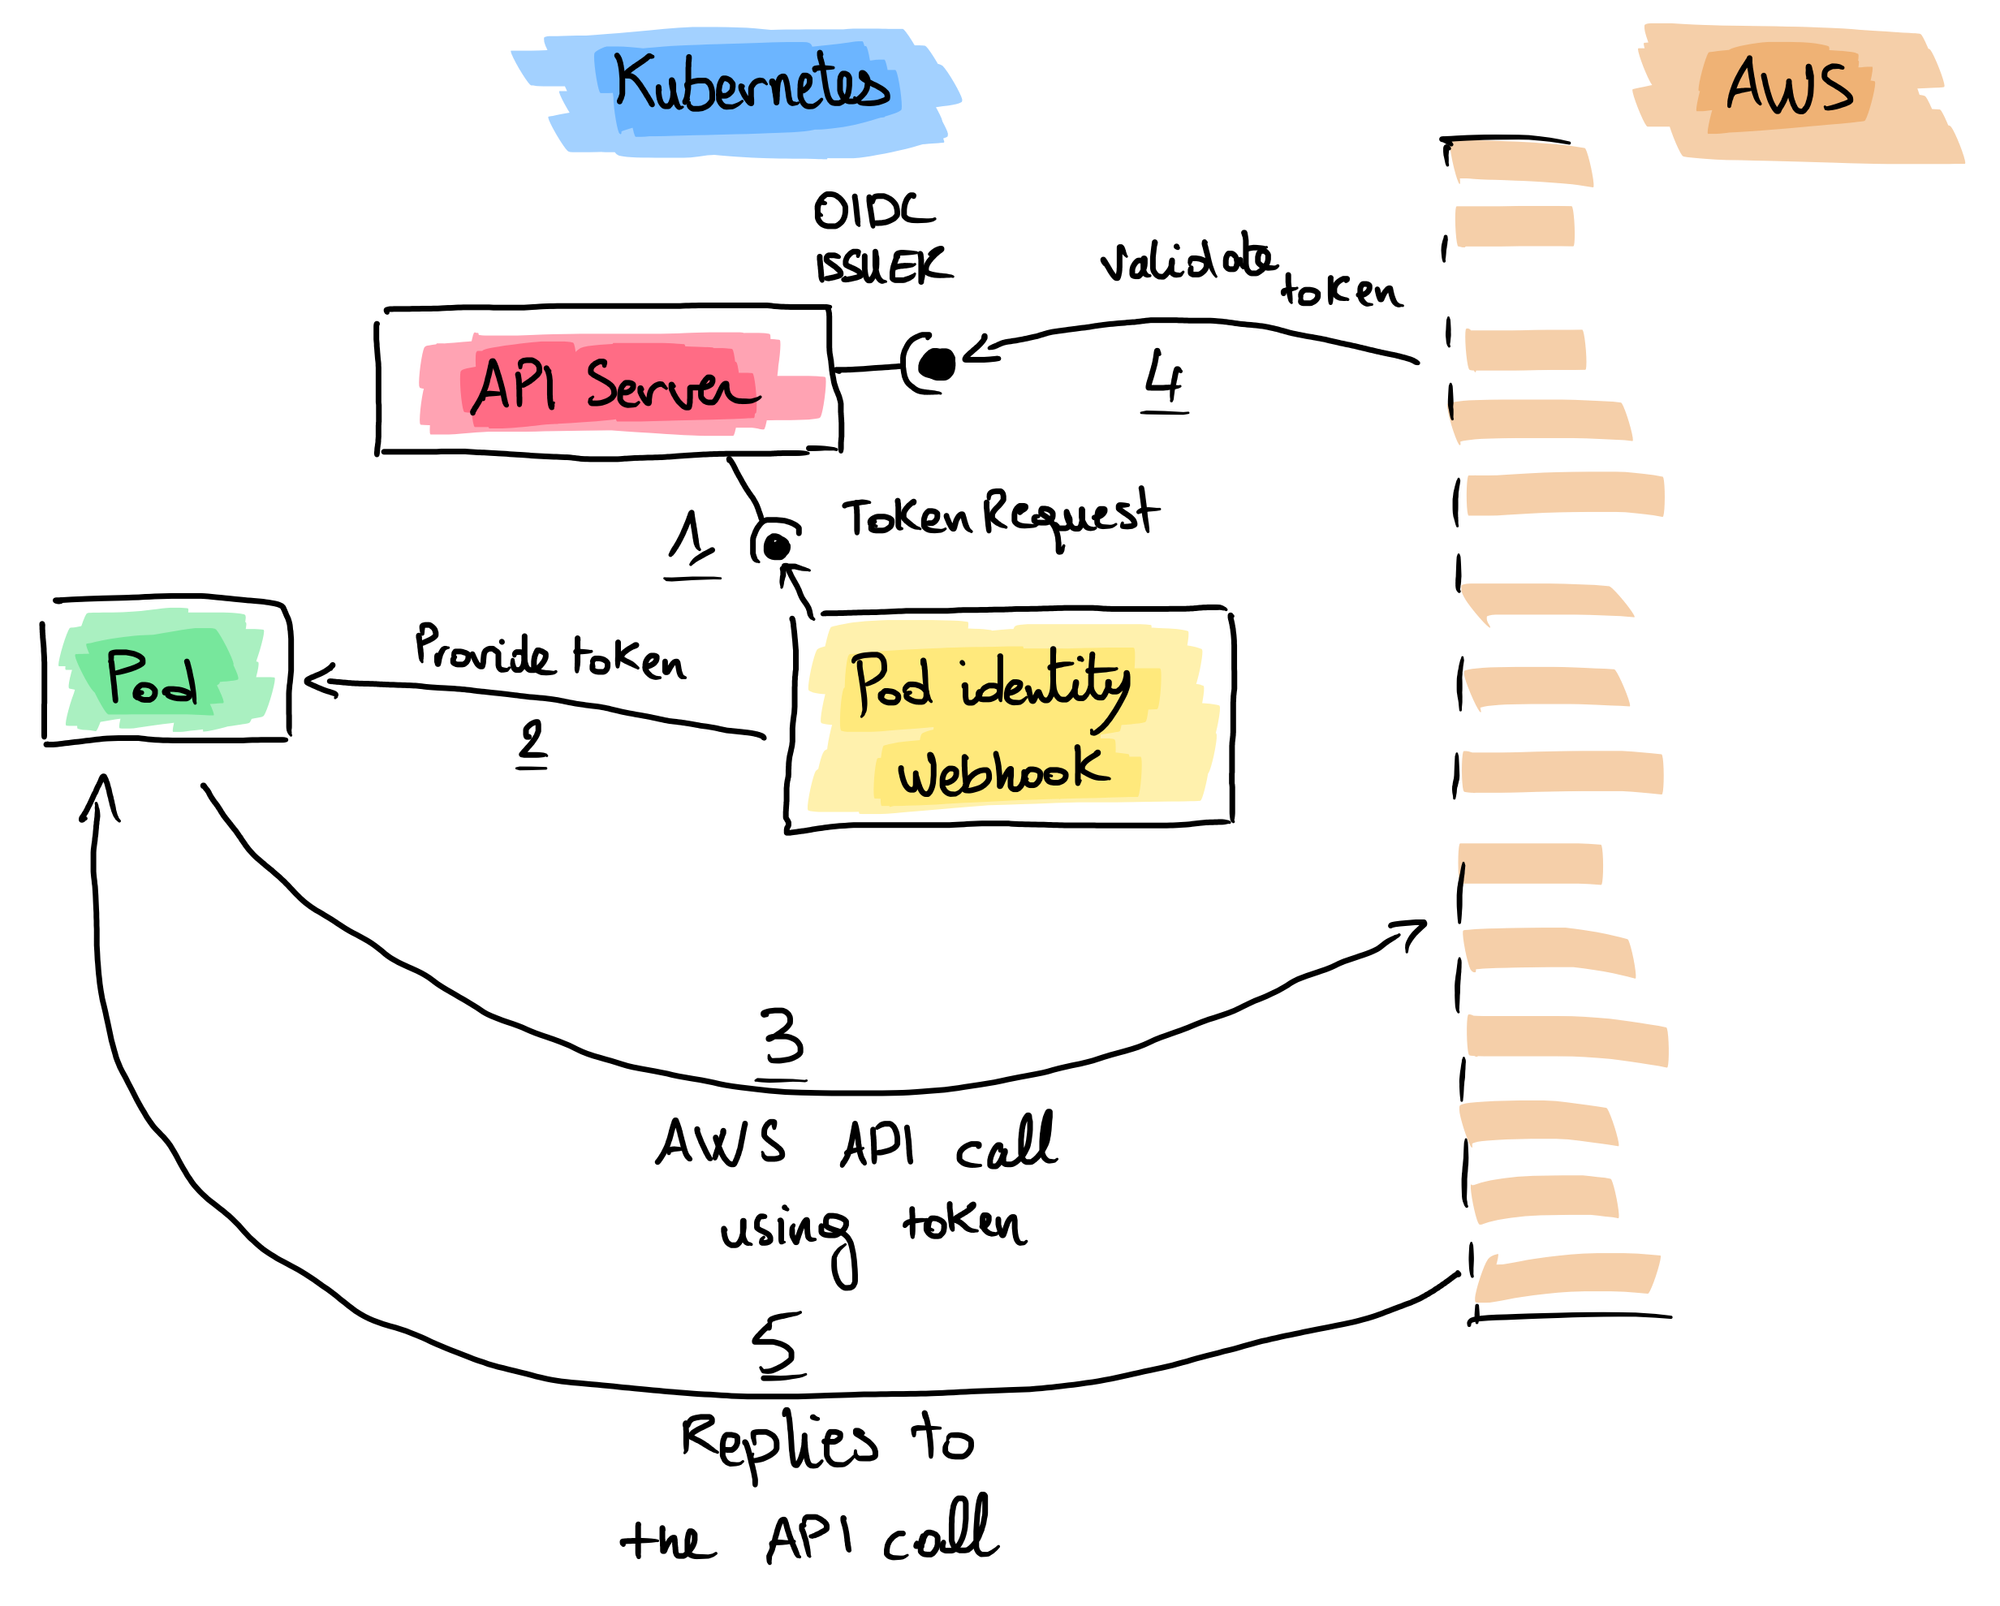
- The Pod Identity Webhook requests a token for the audience specified for AWS (sts.amazonaws.com by default).
- It provides the token through a Projected Volume and injects environment variables in the Pod containers.
- AWS API call is done from inside the Pod, it uses the token through the environment variable AWS_WEB_IDENTITY_TOKEN_FILE.
- AWS IAM validates the token by calling the OIDC Issuer on the JWT that is also already configured in the AWS IAM Identity Provider.
- AWS replies to the call.
Pros
- An extra layer of security, AWS keys are not stored directly in the Pod.
- Key rotation is done automatically.
- Easier RBAC management through AWS IAM of Pods. Say goodbye to AWS IAM Users.
- Limit the impact of key leakage through a lower validity time for the token.
- Instead of securing many AWS Keys you have to secure the key that signs the tokens.
- Even if the key is compromised, the attacker would need the Issuer URL, the AWS IAM Role name, the AWS Account ID, the Kubernetes Namespace and the Service Account name to be able to call the AWS API, and still, the attacker would have limited access if the AWS IAM Role policy is well managed.
Cons
- Another controller to maintain and manage.
Implementation
I am not going to go into details on how to setup your Kubernetes cluster, what I will do, however, is give general ideas of what should be done on the cluster in order for it to work.
You can follow the instructions on this document, but I find it to be very intrusive. You can most definitely manage your own keys and certificates, but that is not the goal of this blog post.
For the ease of operating the cluster and managing certificates more easily, I opt to use cert-manager. Follow the instructions here to install it using Helm. You must also configure an Issuer or a ClusterIssuer to sign certificates.
Exposing the Service Account OIDC (compatible) Issuer
Kubernetes has two routes that are used to identify and authenticate tokens internally by default: /.well-known/openid-configuration and /openid/v1/jwks. You can use these routes to expose the OIDC discovery mechanism to the public. You have multiple choices:
- Host the two resulting JSON files on an S3 bucket and expose them to the public (Very useful when your cluster is not or cannot be publicly exposed).
- Configure an Ingress to forward requests to the Kubernetes API Server.
- Configure a webserver to host these two files.
The idea is to make sure that AWS IAM can reach and retrieve these files in order to verify the tokens.
Let's try the second solution and create this Ingress resource:
apiVersion: networking.k8s.io/v1
kind: Ingress
metadata:
  name: api-server
  namespace: default
  annotations:
    ingress.kubernetes.io/protocol: https
    ingress.kubernetes.io/ssl-redirect: "true"
    cert-manager.io/cluster-issuer: <your-cluster-issuer-here>
spec:
  tls:
  - hosts:
    - <your-domain-here> # Example: kubernetes.example.com
    secretName: k8s-api-server-cert
  rules:
  - host: <your-domain-here> # Example: kubernetes.example.com
    http:
      paths:
      - path: /.well-known/openid-configuration
        pathType: Exact
        backend:
          service:
            name: kubernetes
            port:
              number: 443
      - path: /openid/v1/jwks
        pathType: Exact
        backend:
          service:
            name: kubernetes
            port:
              number: 443
oidc-discovery-ingress.yaml
This ingress will expose these two exact paths to the public in the domain of your choosing. Keep it somewhere safe; we will need it.
If you have no special configuration done before hand, navigating to https://kubernetes.example.com/.well-known/openid-configuration may result in a HTTP 401 response. Let's make them public:
apiVersion: rbac.authorization.k8s.io/v1
kind: ClusterRoleBinding
metadata:
  name: service-account-issuer-discovery-unauthenticated
roleRef:
  apiGroup: rbac.authorization.k8s.io
  kind: ClusterRole
  name: system:service-account-issuer-discovery
subjects:
- apiGroup: rbac.authorization.k8s.io
  kind: Group
  name: system:unauthenticated
clusterrolebinding.yaml
Configure the AWS IAM Identity Provider
There are many ways to configure an Identity Provider on AWS IAM. Let's use the AWS CLI. You can also use the Console or an IaC solution.
- Get the thumbprint for the top intermediate certificate authority of your OIDC Issuer.
- Create a new OIDC Identity Provider on AWS:
aws iam create-open-id-connect-provider --url https://<your-domain-here> --client-id-list "sts.amazonaws.com" --thumbprint-list "<thumbprint>"Be sure that your OIDC endpoints are publicly accessible.
Install Amazon EKS Pod Identity Webhook
The installation is very straight-forward. Just follow the README.md here.
Configure the Service Account Issuer
It is important to add the configured domain of your Ingress to the service account issuer list of your Kubernetes API Server depending on your engine. For example, in the case of K3S, the file /etc/systemd/system/k3s.service would look like this:
[Unit]
Description=Lightweight Kubernetes
Documentation=https://k3s.io
Wants=network-online.target
After=network-online.target

[Install]
WantedBy=multi-user.target

[Service]
Type=notify
EnvironmentFile=-/etc/default/%N
EnvironmentFile=-/etc/sysconfig/%N
EnvironmentFile=-/etc/systemd/system/k3s.service.env
KillMode=process
Delegate=yes
# Having non-zero Limit*s causes performance problems due to accounting overhead
# in the kernel. We recommend using cgroups to do container-local accounting.
LimitNOFILE=1048576
LimitNPROC=infinity
LimitCORE=infinity
TasksMax=infinity
TimeoutStartSec=0
Restart=always
RestartSec=5s
ExecStartPre=/bin/sh -xc '! /usr/bin/systemctl is-enabled --quiet nm-cloud-setup.service'
ExecStartPre=-/sbin/modprobe br_netfilter
ExecStartPre=-/sbin/modprobe overlay
ExecStart=/usr/local/bin/k3s \
    server \
	'--write-kubeconfig-mode=644' \
	'--kube-apiserver-arg=--external-hostname=<your-domain-here>' \
        '--kube-apiserver-arg=--anonymous-auth=true' \
	'--kube-apiserver-arg=--service-account-issuer=https://<your-domain-here>' \
	'--kube-apiserver-arg=--service-account-jwks-uri=https://<your-domain-here>/openid/v1/jwks' \
/etc/systemd/system/k3s.service
It is also worth noting that you may need to specify the --service-account-jwks-uri flag and activate the anonymous-auth feature.
Testing the setup
Create an IAM Role s3-role with a trust policy:
{
    "Version": "2012-10-17",
    "Statement": [
        {
            "Effect": "Allow",
            "Principal": {
                "Federated": "arn:aws:iam::<aws-account-id>:oidc-provider/<your-domain-here>"
            },
            "Action": "sts:AssumeRoleWithWebIdentity",
            "Condition": {
                "StringEquals": {
                    "<your-domain-here>:sub": "system:serviceaccount:default:irsa-test"
                }
            }
        }
    ]
}
IAM Role trust policy
Create a Service Account on the default namespace:
apiVersion: v1
kind: ServiceAccount
metadata:
  name: irsa-test
  annotations:
    eks.amazonaws.com/role-arn: "arn:aws:iam::<aws-account-id>:role/s3-role"
    eks.amazonaws.com/audience: "sts.amazonaws.com"
serviceaccount.yaml
Check if a Pod bound to this Service Account can assume the s3-role:
apiVersion: v1
kind: Pod
metadata:
  name: aws-cli
spec:
  serviceAccountName: irsa-test
  containers:
  - name: aws-cli
    image: amazon/aws-cli:latest
    command: [ "aws", "sts", "get-caller-identity"]
pod.yaml
Check the logs:
kubectl logs pod/aws-cliThe result should look like this:
{
    "UserId": "<RANDOM>:botocore-session-<RANDOM>",
    "Account": "<aws-account-id>",
    "Arn": "arn:aws:sts::<aws-account-id>:assumed-role/s3-role/botocore-session-<RANDOM>"
}
Conclusion
Setting up an OIDC Identity Provider integration between Kubernetes and AWS would seem difficult, but it is not. In this post, we have been able to understand how Kubernetes authenticates its Service Accounts and how we can leverage that to do the same on the AWS API. It may be harder or easier to implement this solution, depending on the Kubernetes engine you use. But the idea remains the same.
To have a more detailed walkthrough and an automated solution depending on the most popular Kubernetes engines, sign up to Siriushra.